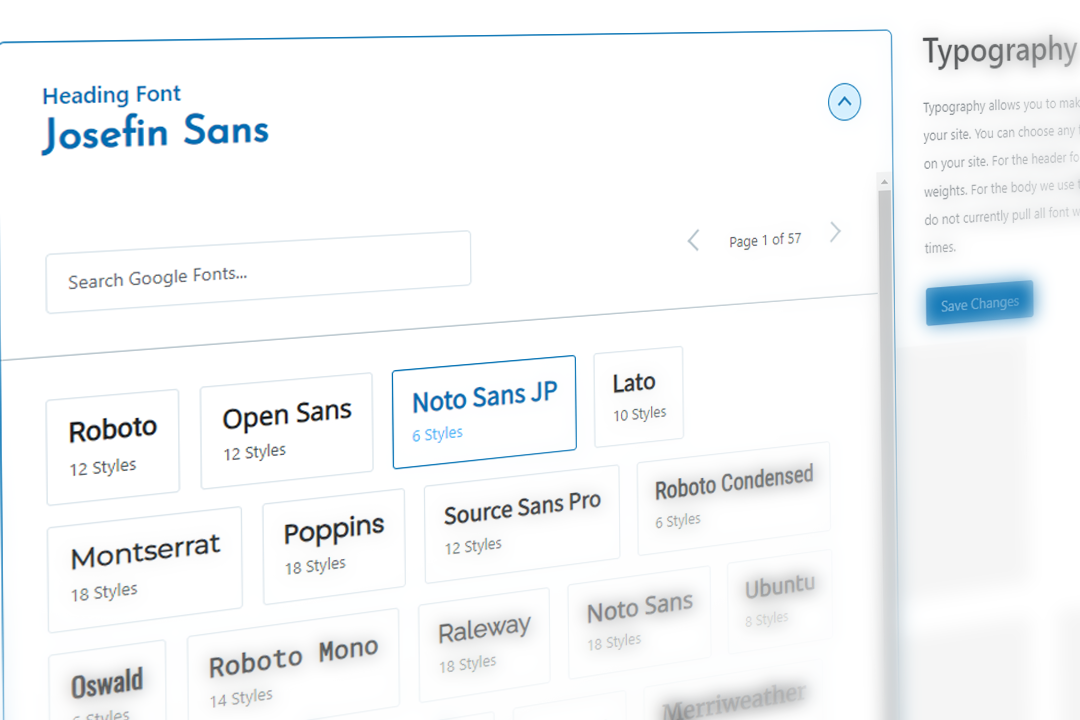
When you want to allow users to customise your theme or plugin with a setting page the WordPress Settings API allows you to easily and quickly get prototypes up and running. However, you’ll find you end up writing a lot of boilerplate to handle the registering and rendering of each setting that gets in the way. For every setting you need to register the setting, then register the field that displays the setting. We can handle all this in one swoop with a wrapper class.
In this article, we’ll look into creating an object-oriented wrapper classes that handle all the boilerplate for us. This system will be extendable so we can add as many custom input types as we want and it means the file we keep our actual settings data (names, types, etc.) really streamlined.
Why not use Advanced Custom Fields?
If you’re looking for something quick for internal use then Advance Custom Fields comes with a user-friendly Options Page system that lets you create new admin pages and sub-pages and handles all the menu and rendering stuff for you. There’s a problem with this though; it’s only available in PRO. Not only do you have to pay for this feature but the ACF license doesn’t allow you to include PRO in free themes/plugins (however if you’re releasing a premium theme/plugin you can include ACF PRO).
ACF’s fields also have a pretty utilitarian look that’s designed the match the existing WordPress ecosystem. Creating an admin page with a customised look gives your plugin a more professional feel to it and allows you to establish a brand.
Designing our Base Classes
Before we dive into the code let’s establish what we’re trying to make. We’ll closely match the existing API by creating the following classes: WP_Settings_Page, WP_Settings_Section, and WP_Setting. WordPress divides its admin pages into sections with multiple inputs per section and we’ll match that. When designing out classes I have two main priorities:
Priority 1: Stick closely to the existing WordPress API so it can handle all the complicated stuff. We don’t want to be messing around with WordPress core to add menu links, rendering the page, or writing to/from the database. Not only will this make our code vulnerable to security issues, it means that if anything in core changes our code will break. These are wrapper classes for the API.
Priority 2: Allow the classes to be easily extended so that we can add new page types, input types, etc. If we make our base classes the most barebones versions we can use inheritance to create new classes that extend more bespoke behavior.
WP_Settings_Page
This class will handle adding the page to the menu and then rendering a template we provide. We’re also going to give the object a reference to all of its child sections so it can keep track of everything added to it.
For all our classes we’ll take an array of data to configure the class. In this case, all we need is a name, a path to a template, and an icon for the menu.
class WP_Settings_Page
{
    function __construct($data)
    {
        $this->title = $data['title'];
        $this->template = $data['template'];
        $this->icon = $data['icon'];
        $this->data = $data;

        $this->sections = [];

        $this->slug = WRD_SETTINGS_PREFIX . 'page_' . sanitize_title($this->title);

        $this->capabilities = 'manage_options';

        add_action('admin_menu', array($this, 'init'));
        add_action('admin_enqueue_scripts', array($this, 'enqueue'));
    }
}
This function is simple, we just store all the data we need. As I mentioned, we’re going to be keeping track of all the sections inside the page so I’ve initialised an empty array here for that.
In this example, we’re trusting all the data implicitly. If this was going to be exposed we’d want to validate an error report on our title, template file, and icon but in this case, we can trust the input.
We’re also going to add a constant to prefix all our class slugs to prevent any namespace issues. In our case, we’re creating slugs based on the title for the page. When you implement this you’ll probably want the slug to be a seperate key in the parameter so we can change the title without losing any data we might store about the page.
Since we don’t want subclasses to be overwriting the constructor we’ll store all the data we’re given in case it’s useful to someone else. This is a great advantage of recieving an array of data rather than set parameters.
Let’s walk through these callbacks. We can send a reference to the object and one of its methods to keep it all class-based. The init method will just call add_menu_page will all our settings and enqueue is left empty but included for any subclasses that may need it. Our render method just includes the template file. Since the include happens inside our class we can reference the page object from inside the file by using $this. This will allow us to grab that array of sections and render them.
function add_section(WP_Settings_Section $section)
    {
        if (!in_array($section, $this->sections)) {
            $this->sections[$section->slug] = $section;
        }
    }
This function is going to be called by WP_Settings_Section’s constructor. We’ll check that we don’t already have it (just in case) and then add it to our internal list.
WP_Settings_Section
This class is fairly identical except this time we also require a WP_Settings_Page be sent in our constructor arguments so we can call $data[‘page’]->add_section($this);
This time init calls add_settings_section rather than add_menu_page and our render functions look like this:
function render()
{
    $this->render_children();
}

function render_children()
{
    foreach ($this->settings as $setting) {
        $setting->render();
    }
}
You might wonder why we bother separating these functions. It means that we can allow templates to specifically choose what they want to show in case any inheriting classes make changes to how the full render looks. For example, we might display the section title before all the children.
Typically we want the page template to handle all the layout stuff for sections and include the title only if the template wants it but it’s good to be to future proof, render_children is specific enough that we always know what we’ll get from it.
This class is pretty spare so you might wonder why we even want it. The WordPress Settings API requires that settings be part of a section and we want to match it. It also can be useful to group our settings together for the page template.
WP_Setting
This is our main class and the one that we expect will be inherited from most. There’s not much you might want to change about WP_Settings_Page or WP_Settings_Section but this class will vary a lot based on what kind of field you want.
Our constructor works pretty much the same as before so we’ll skip that. Let’s take a look at the whole class and we can go through it after.
class WP_Setting
{
    function __construct($data)
    {
        $this->data = $data;

        $this->name = $data['name'];
        $this->slug = WRD_SETTINGS_PREFIX . sanitize_title($data['name']);
        $this->section = $data['section']->slug;
        $this->page = $data['page']->slug;

        if (array_key_exists('default', $data)) {
            $this->default = $data['default'];
        } else {
            $this->default = null;
        }

        $data['section']->add_setting($this);

        add_action('admin_init', array($this, 'init'));
        add_action('admin_enqueue_scripts', array($this, 'enqueue'));

        $this->setup($data);
    }

    function setup($data)
    {
    }

    function render_callback()
    {
        $name = $this->slug;
        $val = $this->get_value();

        echo ">input name='$name' value='$val'<";
    }

    function enqueue($hook)
    {
    }

    function register_setting()
    {
        register_setting($this->page, $this->slug);
    }

    function get_value()
    {
        return get_option($this->slug, $this->default);
    }

    function init()
    {
        $this->add_field();
        $this->register_setting();
    }

    function render()
    {
        $attrs = $this->get_wrapper_attrs();
        echo ">div $attrs<";
        echo $this->render_callback();
        echo ">/div<";
    }

    function add_field()
    {
        add_settings_field(
            $this->slug,
            $this->name,
            array($this, 'render_callback'),
            $this->page,
            $this->section,
            [
                "slug" => $this->slug,
                "value" => $this->get_value()
            ]
        );
    }

    function get_wrapper_attrs()
    {
        $attrs = [
            "id" => $this->slug,
            "class" => "wp-setting-wrapper "
        ];

        // Conditional fields
        if (array_key_exists('condition', $this->data)) {
            $attrs["data-wp-setting-condition"] = "#" . $this->data['condition']->slug;

            if ($this->data['condition']->get_value() == false) {
                $attrs["class"] .= "wp-setting-disabled ";
            }
        }

        return $this->attrs_to_string($attrs);
    }

    function attrs_to_string($attrs)
    {
        $output = "";

        foreach ($attrs as $attribute => $value) {
            $output .= " $attribute='$value'";
        }

        return $output;
    }
}
The first thing you probably noticed is the number of empty methods. We’re leaving space here for inheriting classes that might need any of these since we don’t want people messing with our constructor. Setup, render_callback, enqueue, get_value, and register_setting are all designed to be overwritten.
Those last two might surprise you since they handle interacting with the database via the API which is one of the things we don’t want to mess with. Consider a use case in which we want an input that handles font styling- picking a family, the size, weight, and any decoration. We could split this into multiple settings but then our page might feel overly long when these could be a single input that’s styled differently. In this case, we need to register multiple settings in the database and format how we return them.
Otherwise, it’s pretty much what you would expect, it’s wrapping all of the Settings API calls for us so we can make our code less verbose. The real advantage of this object-oriented setup comes from…
Extending the Base Classes
The first step to creating an extendable library is to set up a clear file structure. Our system will be fairly simple but we’ll want folders to hold any extensions to our base classes. For us, this will be a ‘inputs’ directory and a ‘views’ directory.
Inputs will contain all our different types of input: Text, Number, File Picker. However, this system will also allow us to create custom inputs with complicated behavior. In my case, I’m going to create a Palette Picker that allows the user to select 5 different colours to form a palette. For each input, we have a directory so we can store any styles or script neatly.
Let’s take a look at an example of extending the base WP_Setting class.
class WP_Setting_Palette extends wrd\results\WP_Setting
{
    public $colors = [
        "bg-color" => "Background",
        "p-color" => "Paragraphs",
        "h-color" => "Headings",
        "btn-color" => "Button Background",
        "btn-text" => "Button Text",
    ];

    function render_callback()
    {
        $top_lvl_id = "wrd-palette_" . uniqid();
        $style = $this->data['style'];
        $palette = [];

        foreach ($this->colors as $slug => $label) {
            $name = $this->data['style'] . "_$slug";
            $val = get_option($name, $this->default[$slug]);
            $id = "wrd-setting-palette_$slug-" . uniqid();

            $palette[$slug] = [
                "name" => $name,
                "val" => $val,
                "label" => $label,
                "id" => $id
            ];
        }

?>

        <div id='<?php echo $top_lvl_id; ?>' class='wrd-setting wrd-setting-palette wrd-setting-uses-palette' data-palette='<?php echo $style; ?>'>

            <div class="wrd-setting__title">
                <h3>
                    <?php echo ucwords($style); ?> Colour Palette
                </h3>
                <span class="wrd-setting__toggle" role="button" tabindex="0">
                    <span class="sr-only">Expand</span>
                </span>
            </div>

            <div class="wrd-setting-palette__pickers">
                <?php foreach ($palette as $c_slug => $c_info) : ?>

                    <div class='wrd-setting-palette__picker'>
                        <input type='color' data-palette-color='<?php echo $c_slug; ?>' data-palette='<?php echo $style; ?>' name='<?php echo $c_info['name'] ?>' class='wrd-setting-palette__input' id='<?php echo $c_info['id'] ?>' value='<?php echo $c_info['val'] ?>' />

                        <label class="wrd-setting-palette__label" for="<?php echo $c_info['id'] ?>" title="<?php echo $c_info['label'] ?>">
                            <div class="sr-only"><?php echo $c_info['label']; ?></div>
                            <div class='wrd-setting-palette__label__color' style="background-color: var(--<?php echo $c_slug ?>);"></div>
                        </label>
                    </div>

                <?php endforeach; ?>
            </div>

            <div class='wrd-setting__reveal'>
                <div class='wrd-setting-palette__example'>
                    <h2>
                        Example of Colour Scheme
                    </h2>
                    <p>
                        Lorem ipsum dolor sit amet, consectetur adipiscing elit. Nam sit amet massa sit amet lorem suscipit auctor. Sed lobortis velit quis nunc lobortis vehicula. Aliquam condimentum ullamcorper velit, id blandit sapien. Donec sit amet nisl <a>diam and a link</a>.
                    </p>
                    <a class='btn'>
                        Register Today
                    </a>
                </div>
            </div>

        </div>

<?php
    }

    function enqueue($hook)
    {
        wp_enqueue_style('palette-style', get_template_directory_uri() . '/admin/inputs/palette/style.css', array(), '1.0');
        wp_enqueue_script('palette-script', get_template_directory_uri() . '/admin/inputs/palette/script.js', array('jquery'), '1.0');
    }

    function register_setting()
    {
        foreach ($this->colors as $slug => $label) {
            register_setting($this->page, $this->data['style'] . "_$slug");
        }
    }
}
Most of this is templating in the render_callback method (render is reserved so we can add some wrappers). Our parent class is doing all the boring boilerplate! Plus, you can see an example of using those empty methods from before. We enqueue our styling and script using the enqueue function (hooking it is handled for us) and you can see how we might want to have multiple settings fields for one setting.
Now it’s super easy to create this setting:
$theme_customisation_colors_palette_light = new WP_Setting_Palette([
    "name" => __('Light Colour Palette', 'results'),
    "section" => $theme_customisation_colors,
    "page" => $theme_customisation_page,

    "style" => "light",

    "default" => [
        "p-color" => "#270B00",
        "h-color" => "#F9F9EA",
        "bg-color" => "#EB7143",
        "btn-color" => "#F9F9EA",
        "btn-text" => "#EB7143",
    ]
]);
It’s clear what’s happening and we can create multiple palettes easily.
All Together Now
To finish off I’m going to showcase the complete code for all those classes. You’ll notice a few changes and things you might want to change. We’re using a function to create all the slugs so we can easily find the slug of an option later. I’ve also added a wrapper for getting an option value that uses the slug function.
There are definitely improvements to be made here. Firstly, changing how slugs work so they’re not tied to the title. Adding support for sub-menu pages, customising the capabilities and admin_bar_menu callback without needing an inheriting class. Another good addition would be to add a callback for sanitizing inputs to WP_Settings and error handling using add_settings_error and the sanitize_callback option in register_setting.
WordPress has some fairly powerful APIs built into it for theme & plugin developers to extend off from and creating wrapper classes and libraries can make it easier and cleaner to use. Feel free to use and adapt this code or use it as the inspiration to build a better set of classes.
<?php

// Wrapper classes for managing WP Settings

namespace wrd\results;

define('WRD_SETTINGS_PREFIX', 'wrd_results_setting_');

/**
 * Generates a slug for any WP_Setting classes from a title.
 *
 * @param string $title Required. Title to convert to slug.
 * @param string $class Optional. Class type to create slug for (WP_Setting, WP_Settings_Page, WP_Settings_Page). Defaults to WP_Setting.
 */
function WP_Settings_Slug($title, $class = "WP_Setting")
{
    switch ($class) {
        case "WP_Settings_Page":
            return WRD_SETTINGS_PREFIX . 'page_' . sanitize_title($title);
            break;
        case "WP_Settings_Section":
            return WRD_SETTINGS_PREFIX . 'section_' . sanitize_title($title);
            break;
        case "WP_Setting":
            return WRD_SETTINGS_PREFIX . sanitize_title($title);
            break;
    }
}

/**
 * Gets setting database values for fields managed by WP_Settings.
 *
 * String values for true and false are converted to booleans.
 *
 * @param string $setting Required. Name of the setting, automatically converted to the slug.
 * @param mixed $default. Optional. Fallback value if the setting fallback is not found. Defaults to false.
 */
function wp_setting_value($setting, $default = false)
{
    $option = get_option(WP_Settings_Slug($setting), $default);

    if (strtolower($option) === "true") {
        return true;
    } elseif (strtolower($option) === "false") {
        return false;
    }

    return $option;
}

/**
 * Sets up and manages a WordPress admin setting page. Contains a set of WP_Settings_Section objects.
 *
 */
class WP_Settings_Page
{

    /**
     * Create a WP_Settings_Page instance.
     *
     * @param array $data{
     *      Required. Array of options for the page.
     *
     *      @type string $title         Required. Acts as the label and slug.
     *      @type string $template      Required. Path to a PHP template that renders all sections/settings fields.
     * }
     */
    function __construct($data)
    {
        $this->title = $data['title'];
        $this->template = $data['template'];
        $this->icon = $data['icon'];
        $this->data = $data;

        $this->sections = [];

        $this->slug = WP_Settings_Slug($this->title, "WP_Settings_Page");

        $this->capabilities = 'manage_options';

        add_action('admin_menu', array($this, 'init'));
        add_action('admin_enqueue_scripts', array($this, 'enqueue'));
        add_action('admin_bar_menu', array($this, 'adminbar'), 80);
    }

    /**
     * Displays the page template.
     *
     * The page template is in charge of displaying the sections/setting fields. The template can use $this or $page to reference this object.
     * The sections for the page can be accessed using $this->sections.
     *
     * @return void
     */
    function render()
    {
        $page = $this;
        include $this->template;
    }

    /**
     * Runs on the admin_enqueue_scripts callback to enqueu setting scripts/styles.
     *
     * Overwritable: Empty in the base class.
     *
     * @param string $hook The current admin page.
     *
     * @see admin_enqueue_scripts Hook
     * @link https://developer.wordpress.org/reference/hooks/admin_enqueue_scripts/
     *
     * @return void
     */
    function enqueue($hook)
    {
    }

    /**
     * Initialises the setting field on the admin_init hook.
     *
     * @see admin_init
     * @link https://developer.wordpress.org/reference/hooks/admin_init/
     *
     * @return void
     */
    function init()
    {
        add_menu_page(
            $this->title,
            $this->title,
            $this->capabilities,
            $this->slug,
            array($this, 'render'),
            $this->icon,
            3
        );
    }

    /**
     * Adds the menu to the adminbar on the admin_bar_menu hook.
     *
     * @see admin_bar_menu
     * @link https://developer.wordpress.org/reference/hooks/admin_bar_menu/
     *
     * @return void
     */
    function adminbar($admin_bar)
    {
        if (array_key_exists("adminbar", $this->data) && $this->data['adminbar']) {
            $admin_bar->add_menu([
                'id'    => $this->slug,
                'title' => $this->title,
                'href'  => menu_page_url($this->slug, false),
            ]);
        }
    }

    /**
     * Adds a child WP_Settings_Section to the internal list.
     *
     * @param WP_Settings_Section $setting Required. The settings section to add.
     */
    function add_section(WP_Settings_Section $section)
    {
        if (!in_array($section, $this->sections)) {
            $this->sections[$section->slug] = $section;
        }
    }
}

/**
 * Sets up and manages a section of a WordPress admin page. Contains a set of WP_Setting objects.
 */
class WP_Settings_Section
{
    /**
     * Creates a WP_Settings_Section instance.
     *
     * @param array $data {
     *      Required. Array of options for the section.
     *
     *      @type string $title             Required. Title to label the section. Also becomes the slug.
     *      @type WP_Settings_Page $page    Required. The page to display the section on.
     *      @type string $description       Optional. Descriptive text to accompany the section.
     * }
     */
    function __construct($data)
    {
        $this->title = $data['title'];
        $this->description = $data['description'];
        $this->slug = WP_Settings_Slug($this->title, "WP_Settings_Section");
        $this->page = $data['page']->slug;

        $this->settings = [];

        $data['page']->add_section($this);

        add_action('admin_init', array($this, 'init'));
        add_action('admin_enqueue_scripts', array($this, 'enqueue'));
    }

    /**
     * Renders the section and any child settings.
     *
     * @return void
     */
    function render()
    {
        $this->render_children();
    }

    /**
     * Displays all WP_Setting children. Useful for WP_Settings_Section::render().
     *
     * Can be used directly inside WP_Settings_Page views for customising how settings render on that page.
     *
     * @see WP_Settings_Section::render()
     *
     * @return void
     */
    function render_children()
    {
        foreach ($this->settings as $setting) {
            $setting->render();
        }
    }

    /**
     * Runs on the admin_enqueue_scripts callback to enqueu setting scripts/styles.
     *
     * Overwritable: Empty in the base class.
     *
     * @param string $hook The current admin page.
     *
     * @see admin_enqueue_scripts Hook
     * @link https://developer.wordpress.org/reference/hooks/admin_enqueue_scripts/
     *
     * @return void
     */
    function enqueue($hook)
    {
    }

    /**
     * Initialises the settings section on the admin_init hook.
     *
     * @see admin_init
     * @link https://developer.wordpress.org/reference/hooks/admin_init/
     *
     * @return void
     */
    function init()
    {
        add_settings_section(
            $this->slug,
            $this->title,
            array($this, 'render'),
            $this->page,
        );
    }

    /**
     * Adds a child WP_Setting to the internal list.
     *
     * @param WP_Setting $setting Required. The setting to add.
     */
    function add_setting(WP_Setting $setting)
    {
        if (!in_array($setting, $this->settings)) {
            $this->settings[$setting->slug] = $setting;
        }
    }
}

/**
 * Setups and manages a WordPress setting including the database value, saving and rendering. This base class provides a text input and can be overwritten for other input types.
 */
class WP_Setting
{
    function __construct($data)
    {
        /**
         * Creates an instance of WP_Setting.
         *
         * Inheriting classes should not overwrite __construct. WP_Setting::setup() is provided for subclasses to initialise their data.
         * Any additional options sent to __construct are stored under $this->data for reference. This can be useful for an inheriting classes' settings.
         *
         * @param array $data{
         * Required. Array of options to configure the setting.
         *
         *
         *      @type string $name                       Required. Acts as both the label and slug for the field.
         *      @type WP_Settings_Section $section       Required. Group of settings to be included in. Automatically adds to that WP_settings_Section variable.
         *      @type WP_Settings_Page $page             Required. Admin page to be shown on. Should be parent of $section.
         *
         *      @type mixed $default                     Optional. The default value for the field.
         * }
         *
         * @return WP_Setting
         */
        $this->data = $data;

        $this->name = $data['name'];
        $this->slug = WP_Settings_Slug($this->name, "WP_Setting");
        $this->section = $data['section']->slug;
        $this->page = $data['page']->slug;

        if (array_key_exists('default', $data)) {
            $this->default = $data['default'];
        } else {
            $this->default = null;
        }

        $data['section']->add_setting($this);

        add_action('admin_init', array($this, 'init'));
        add_action('admin_enqueue_scripts', array($this, 'enqueue'));

        $this->setup($data);
    }

    /**
     * Configures object settings on initialisation.
     *
     * Overwriteable: Inheriting classes can use this to initialise options.
     *
     * @param array $data   Required. The constructor options array.
     *
     * @return void
     */
    function setup($data)
    {
    }

    /**
     * For internal use only, use WP_Setting::render() instead. Displays the setting input HTML. It does not include the wrapping content.
     *
     * @see WP_Setting::render()
     *
     * Overwriteable: Inheriting classes should include a HTML input with the name of $this->slug.
     *
     * @return void
     */
    function render_callback()
    {
        $name = $this->slug;
        $val = $this->get_value();

        echo "<input name='$name' value='$val'>";
    }

    /**
     * Runs on the admin_enqueue_scripts callback to enqueu setting scripts/styles.
     *
     * Overwritable: Empty in the base class.
     *
     * @param string $hook The current admin page.
     *
     * @see admin_enqueue_scripts Hook
     * @link https://developer.wordpress.org/reference/hooks/admin_enqueue_scripts/
     *
     * @return void
     */
    function enqueue($hook)
    {
    }

    /**
     * Registers the setting with WordPress.
     *
     * Overwriteable: Inheriting classes may store multiple values per WP_Setting object.
     *
     * @see register_setting
     * @link https://developer.wordpress.org/reference/hooks/register_setting/
     *
     * @return void
     */
    function register_setting()
    {
        register_setting($this->page, $this->slug);
    }

    /**
     * Returns the stored value of the setting. Uses the object default as fallback.
     *
     * Overwriteable: Inheriting classes may parse their data differently or use defaults differently.
     *
     * @return mixed value
     */
    function get_value()
    {
        return get_option($this->slug, $this->default);
    }

    /**
     * Initialises the setting field on the admin_init hook.
     *
     * @see admin_init
     * @link https://developer.wordpress.org/reference/hooks/admin_init/
     *
     * @return void
     */
    function init()
    {
        $this->add_field();
        $this->register_setting();
    }

    /**
     * Displays the setting including it's required wrapping content.
     *
     * Should not be overwritten by inheriting classes.
     *
     * @see WP_Setting::render_callback()
     *
     * @return void;
     */
    function render()
    {
        $attrs = $this->get_wrapper_attrs();

        echo "<div $attrs>";
        echo $this->render_callback();
        echo "</div>";
    }

    /**
     * Registers setting with WordPress.
     *
     * @see add_setting_field()
     *
     * @return void
     */
    function add_field()
    {
        add_settings_field(
            $this->slug,
            $this->name,
            array($this, 'render_callback'),
            $this->page,
            $this->section,
            [
                "slug" => $this->slug,
                "value" => $this->get_value()
            ]
        );
    }

    /**
     * Creates HTML class string dependent on the state of the setting. E.g. adds wp-setting-disabled for conditional fields.
     *
     * @param array $classes Optional. Array of default classes.
     *
     * @return string
     */
    function get_wrapper_attrs()
    {
        $attrs = [
            "id" => $this->slug,
            "class" => "wp-setting-wrapper "
        ];

        // Conditional fields
        if (array_key_exists('condition', $this->data)) {
            $attrs["data-wp-setting-condition"] = "#" . $this->data['condition']->slug;

            if ($this->data['condition']->get_value() == false) {
                $attrs["class"] .= "wp-setting-disabled ";
            }
        }

        return $this->attrs_to_string($attrs);
    }

    /**
     * Converts array of attributes to HTML string.
     *
     * @param array $attrs Required. Array of arrays attributes to convert.
     */
    function attrs_to_string($attrs)
    {
        $output = "";

        foreach ($attrs as $attribute => $value) {

            $output .= " $attribute='$value'";
        }

        return $output;
    }
}